The WSB website – business.wisc.edu – utilizes a WordPress calendar plugin to handle all of our public/marketed events.
This plugin allows us to display all upcoming WSB events in one place – business.wisc.edu/events – and to dynamically pull upcoming, categorized events onto relevant pages across our site, such as the Alumni Events page, Weinert Center Events page, and FTMBA Events page.
Example Events:
- Wisconsin Real Estate and Economic Outlook Conference
- WSB in NYC
- AI Marketing Symposium
- Badgers in Finance
- BBA Graduation
- AI Day
On This Page:
| Table of Contents |
|---|
Overview of the Calendar System
| HTML |
|---|
<iframe id="kaltura_player" src="https://cdnapisec.kaltura.com/p/1660902/sp/166090200/embedIframeJs/uiconf_id/25717641/partner_id/1660902?iframeembed=true&playerId=kaltura_player&entry_id=1_kdr3n1jg&flashvars[streamerType]=auto&flashvars[localizationCode]=en_US&flashvars[leadWithHTML5]=true&flashvars[sideBarContainer.plugin]=true&flashvars[sideBarContainer.position]=left&flashvars[sideBarContainer.clickToClose]=true&flashvars[chapters.plugin]=true&flashvars[chapters.layout]=vertical&flashvars[chapters.thumbnailRotator]=false&flashvars[streamSelector.plugin]=true&flashvars[EmbedPlayer.SpinnerTarget]=videoHolder&flashvars[dualScreen.plugin]=true&flashvars[Kaltura.addCrossoriginToIframe]=true&&wid=1_97ldesdi" width="649" height="401" allowfullscreen webkitallowfullscreen mozAllowFullScreen allow="autoplay *; fullscreen *; encrypted-media *" frameborder="0" title="Kaltura Player"></iframe> |
Training and Access
You must receive training from the web team before you will be granted access to edit calendar events.
To request event training, please email webteam@wsb.wisc.edu with your request and the following:
- Your first and last name
- Your netID (note – this is not a staff/student ID number)
- Your status (student employee, staff, or faculty)
- Which dept/program you work for
Login to WordPress
- Go to business.wisc.edu/wp-admin (bookmark this page for easy access).
- Click "Sign in with your Net ID" button. Login using Duo.
- Typing in your Net ID with the associated password will not work on this login page.
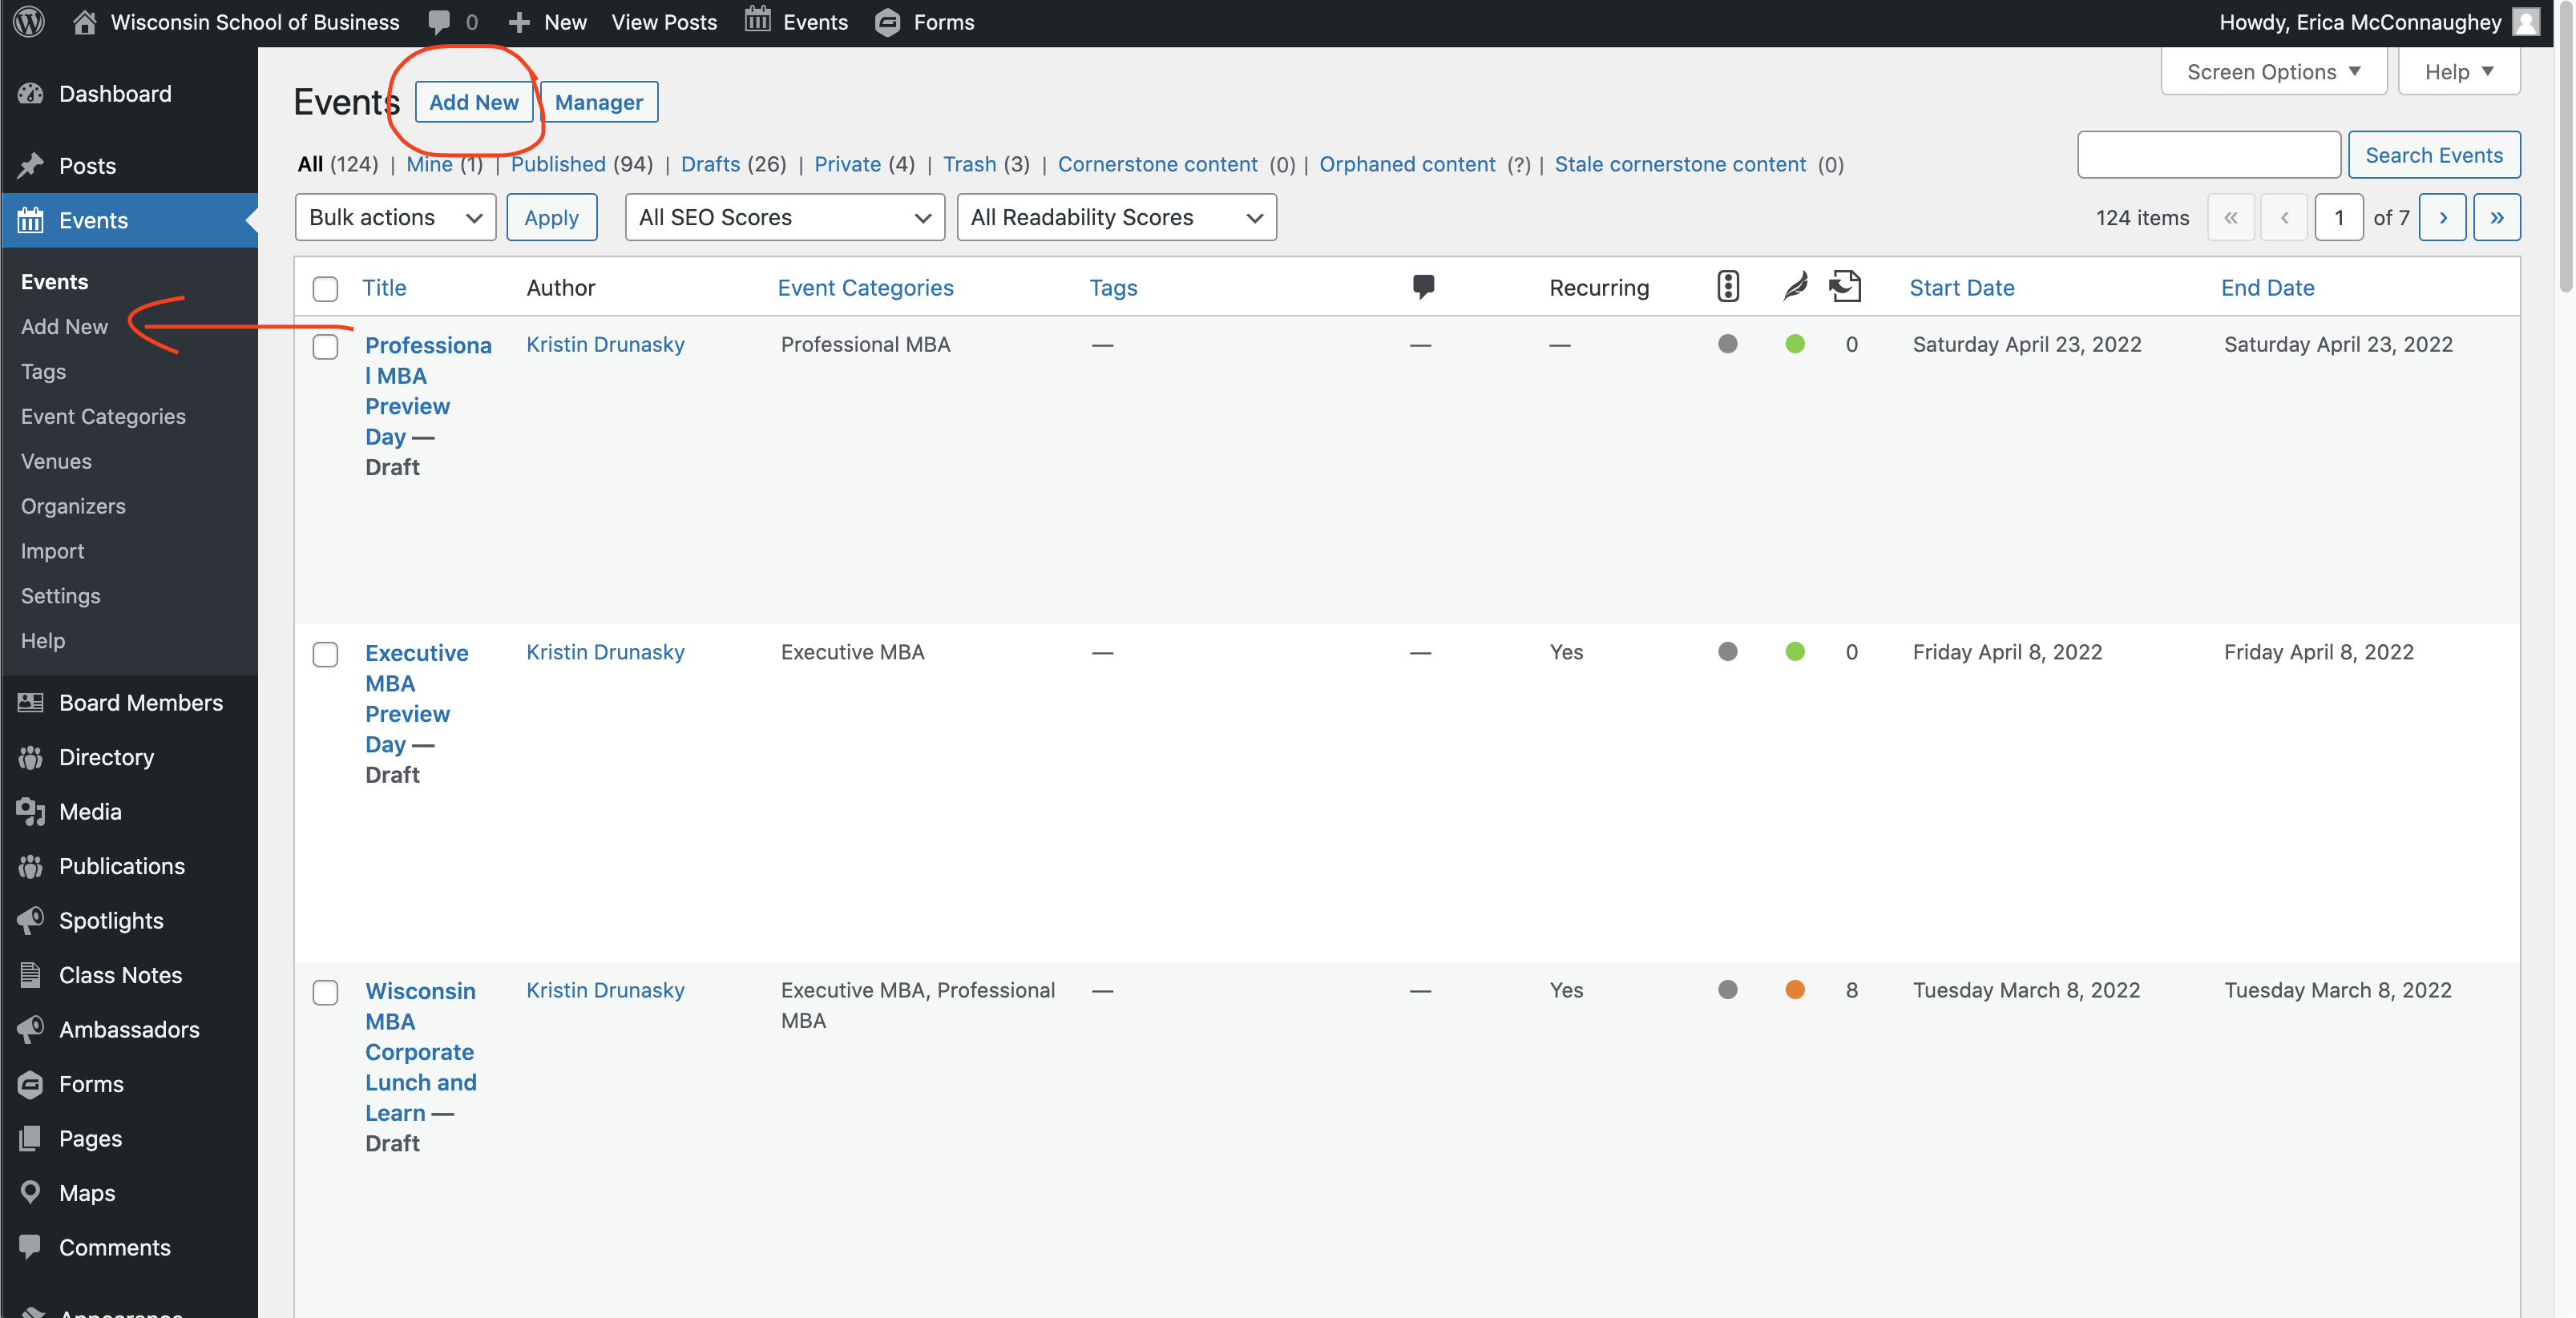
Add a New Event
- Navigate to Events in the left menu.
- If you don't see Events, you will need to request event editing access from the web team.
- Click Add New (see the two locations for this button in the screenshot below)
Title
Add the name of your event.
If you are copying and pasting the title, you will need to use plain text. The following are shortcuts for plain text pasting:
- For Windows - Ctrl+Shift+V
- For Macs - Cmd+Shift+V
Date and Time
Click on the date and time to see the calendar options appear.
This is also where you can indicate that an event will be recurring.
- If you select this option, then decide you don't want it to be a recurring event, you will have to delete the event and start over.
Description
Add a description to your event by typing (or pasting in your content) where it says "Type / to choose a block"
- You can bold or italicize text.
- Add multiple paragraphs as needed.
- If it is a virtual event, consider adding "This is a virtual event." to the description if "virtual" isn't in the event name.
- If no registration is required for an event, you may want to add "Registration is not required." or a similar message.
Short event description example:
Join the admissions team for an informative chat/webinar series designed to familiarize you with the admissions process, and provide guidance on how to produce a competitive application. This is a virtual event.
Long event descriptions:
See the example event for layout and styling reference. You must be logged in to WP to view this private event.
Headings (recommended)
- If the description is long or has more than two sections, you should add headings to make it more accessible and easier to scan.
- There are two ways to add a heading:
- Add a new line beneath a paragraph (hit enter key) and where it says "Type / to choose a block" type /heading and select it
- Or click the plus button and type "heading"
- Select the heading size (H3, H4, H5, or H6)
- Make sure to nest your headings in an organized way, like you would for an outline:
- Heading 1 (event title only - this is formatted for you)
- Heading 2 (date and time only - this is formatted for you)
- Heading 3
- Heading 4 (subsection of Heading 3)
- Heading 4 (subsection of Heading 3)
- Heading 3 (e.g. About the Speaker)
- Heading 3
- Heading 2 (date and time only - this is formatted for you)
- Heading 1 (event title only - this is formatted for you)
- Make sure to nest your headings in an organized way, like you would for an outline:
- There are two ways to add a heading:
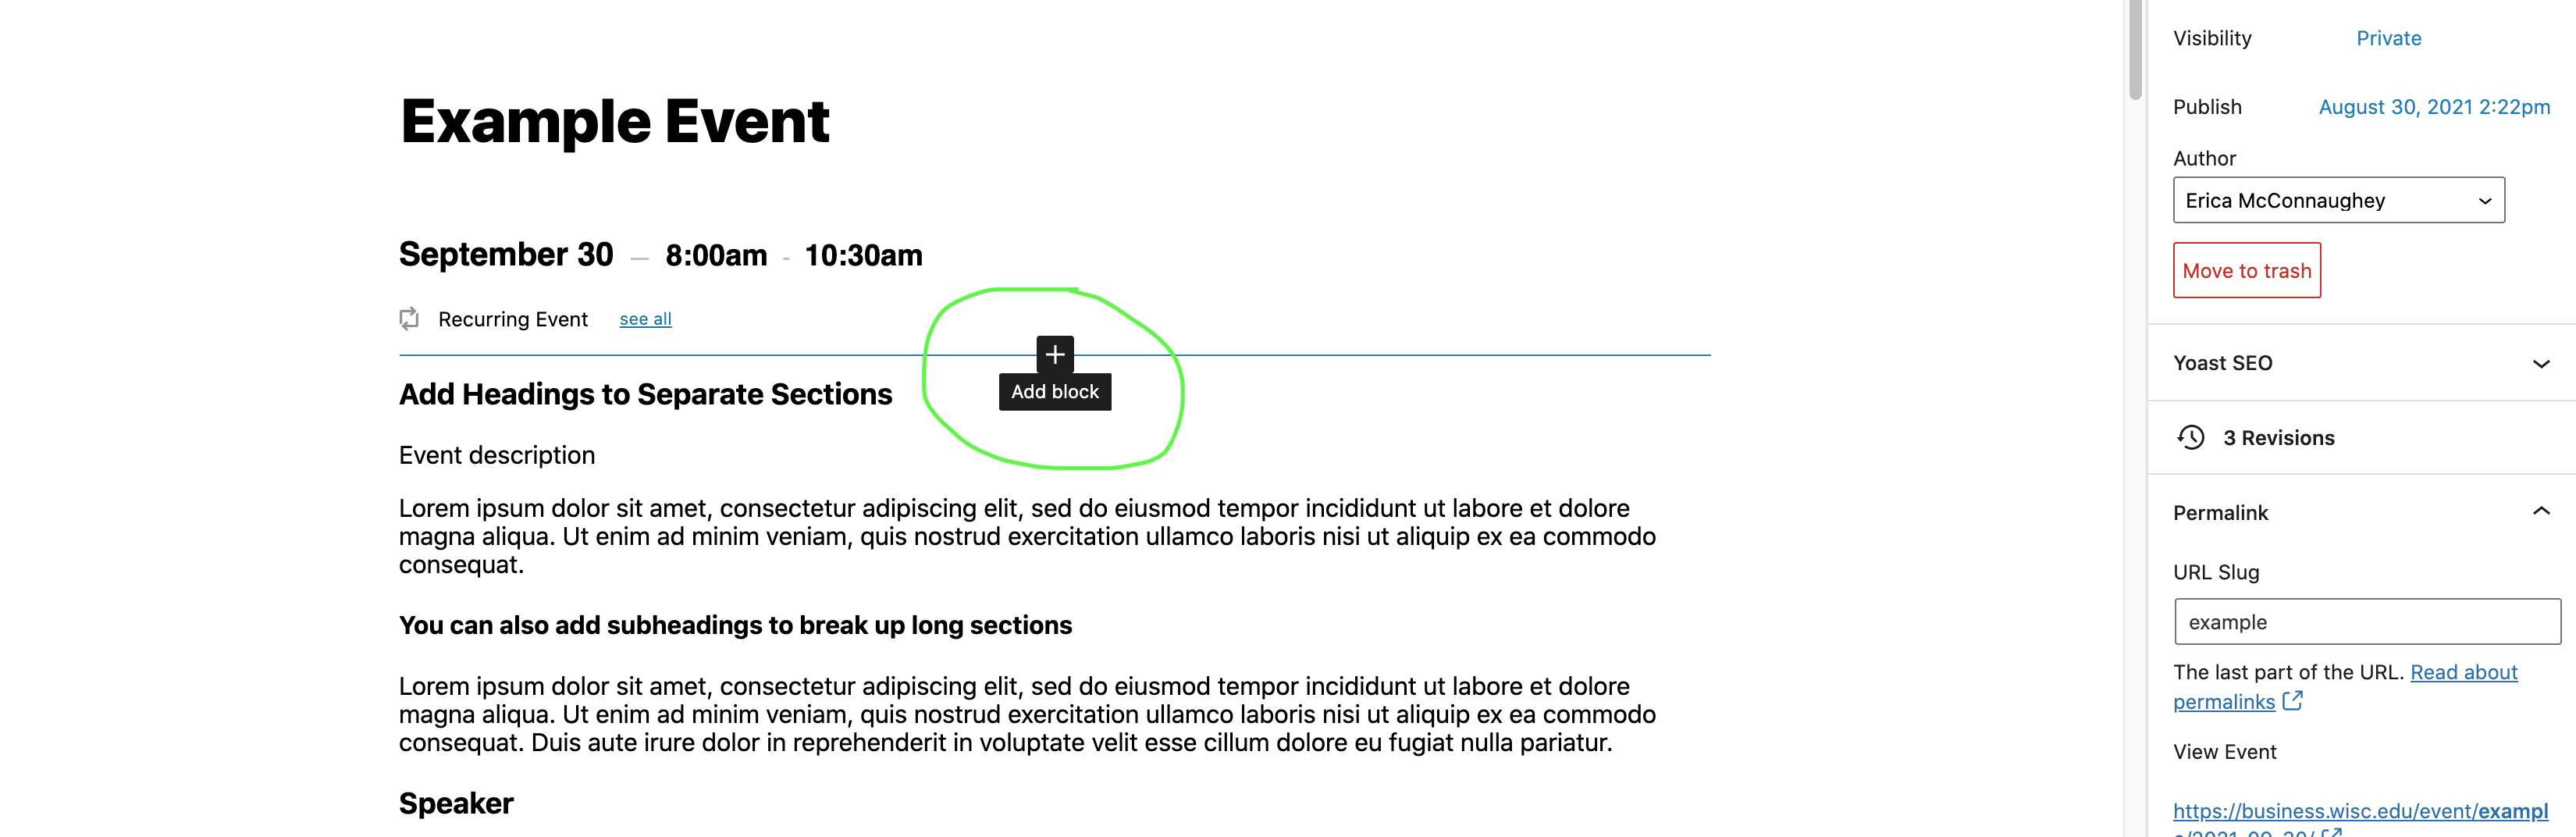
Separator Line (aka: Horizontal Rule - optional)
- You can add a line between sections by adding a separator block.
- Click the plus button and type "separator". Select the option that appears.
- This can be moved up or down the page with the up and down arrows in the toolbar.
Supporting Images (optional)
These instructions are for adding supporting images within your event description (such as a speaker headshot).
For banner/header images, see information below about adding a featured image.
- Supporting image dimensions will vary. You should upload the original image (max size 2400px wide) so it will be high quality. See image editing instructions below to learn how to resize an image that is too large or needs to be cropped.
- WordPress creates different sizes of every image you upload and allows you to crop the image or resize it as necessary.
Adding/Selecting an Image
- Click the button with a plus sign and type "image" to search for the image block and select it. (Or hit the enter key to start a new line and type "/image" and select the option that pops up.)
- Select "Media Library"
- If you or a team member already uploaded the image to the WP media library, search for and select the image.
- Tip: When searching the media library, be sure to select "All Files" on the left side before you search so that WordPress looks through the entire media library. Alternatively, if you know which folder the image is in, you can drill down through the path of image folders to get to your image.
- Make sure the image has alt text describing what is in the photo, including all text displayed in the image, to meet accessibility requirements.
- Otherwise, click the Upload Files tab to add your image to the correct media library folder.
- Under Choose Folder, click on "Uncategorized". In the dropdown, look for "Calendar Events" folder and then select your dept/program folder below it.
- Tip: before selecting the Upload Files tab, find the folder you need to add images to in the Media Library tab and select it. When you navigate to the Upload Files tab, your folder will be selected for you.
- Drag and drop the image from your computer or click "Select Files" and find your image on your computer.
- Under Choose Folder, click on "Uncategorized". In the dropdown, look for "Calendar Events" folder and then select your dept/program folder below it.
- Once the image has loaded, you must add alt text describing what is in the image. This is an accessibility requirement for every image that provides readers important context (especially images that have text in them). All text in an image must be typed out in the alt text field. If the image is purely decorative, you can leave the alt text blank.
- You can also add a caption if you like.
- Tip: Adding the caption to the image in the media library means it will display under the image every time it is used. If you might use the image multiple times and don't always want the caption displayed, you will need to add it to the image block in the event editor instead.
- If you or a team member already uploaded the image to the WP media library, search for and select the image.
- Select "Media Library"
- Click the button with a plus sign and type "image" to search for the image block and select it. (Or hit the enter key to start a new line and type "/image" and select the option that pops up.)
Editing an Image
- Click on the image block to see editing options.
- Above the image you can:
- move the image to a higher or lower position on the page (use the up or down arrow; you can also grab the six dots and drag the block up or down)
- choose an alignment option (only use align left, align center, or align right) -- click the three horizontal lines (with the middle one being thicker than the others) in the toolbar to choose your image alignment.
- Above the image you can:
- Click on the image block to see editing options.

- add a hyperlink to the image
- crop the image
- On the right side of the screen you can:
- add alt text (remember this is required for every image)
- edit the image size (select a predetermined size created by WordPress or reduce the size)
- Never make an image larger than its original size. This will make it blurry or pixelated.
- Make sure you don't stretch or squash the image. You can adjust height and width but must keep their proportions the same. If you need the proportions to be different, you have to crop the image. (see above)
- Below the image you can add an optional caption. (This is the recommended location for adding a caption, if you would like one displayed.)
| Info | ||
|---|---|---|
| ||
Are images (or other content) in your post crowded too close to each other or messing up the formatting of other content? This can happen when change an image's alignment (e.g. when you choose "align left" or "align right") Try adding a Spacer block between/below them.
|
Deleting an Image
- Use one of the following methods:
- From a blog post, click on an image block and click "replace" if you already have an image added to the block. From there, find the image to delete and click "Delete permanently" (this will be under the image on the right side of the screen).
- Go to the WP login dashboard and click Media in the left side menu. Find your image by searching or going through the folders and hover over it. Click "Delete permanently".
- Use one of the following methods:
Accordions (optional)
Accordions should only be used for event FAQs (frequently asked questions)
You should only use 1 accordion per event. Accordions hide information from users, which can negatively affect the user experience, and from search engines, which can hinder a user's ability to find your event via web search.
- instructions coming soon
Price (optional)
Enter the cost for attending the event.
Leave blank if your event is free. (You can always mention the event is free in your event description.)
Organizer (optional)
Start typing in the name of your group/dept., look for an existing entry to appear, and select it. Don't create a duplicate entry.
Existing organizer options:
- Center for Professional and Executive Development
- MBA Admissions
- Master's Program Admissions Team
- Alumni Relations
- Undergraduate Admissions Team
- Undergraduate Careers
- Undergraduate Student Life
- Global Programs
- James A. Graaskamp Center for Real Estate
You can add a new organizer if yours is not in the list.
Or leave blank if desired.
Location/Venue (recommended for in-person events)
IMPORTANT: Remove this block for virtual events. Why? Because adding a virtual venue creates a misleading link. For example, if your event is held via Zoom and you add Zoom as a venue, then it will appear as a link (Zoom); users are likely to think this link takes them to the Zoom meeting, but it doesn't.
- To remove it click inside the venue block; an editing toolbar will appear at the top of the block. Click the three vertical dots and select "delete".
To add your venue for in-person events, start typing in the name of your venue, look for an existing venue to appear, and select it. Don't create a duplicate entry.
Venue options:
- Executive Dining Room
- Fluno Center
- Grainger Hall
- The Plenary Room
- Gordon Dining and Event Center
- Career Engagement Studio
You can add a new venue if yours is not in the list.
Event Website Button (recommended if applicable)
You can add one call-to-action button to your event page. You will need to add the copy to display on the button and your event URL/link.
- Make sure the copy on the button gives users a clear idea of what happens when they click it.
- Registration buttons should say Register for this event or Register now
- Virtual events with no registration can have buttons that say Join us on Zoom (or whatever platform you are using for the event)
- Button copy should be sentence case (only the first word and important/proper nouns are capitalized)
- You can move the button higher or lower on the page if desired.
- First click on the button and then use the up and down arrows in the toolbar to move it.
- Do not add your link as a text link and a button. Each link should only appear once on the page, either as a text link or a button.
Or leave this field blank if desired.
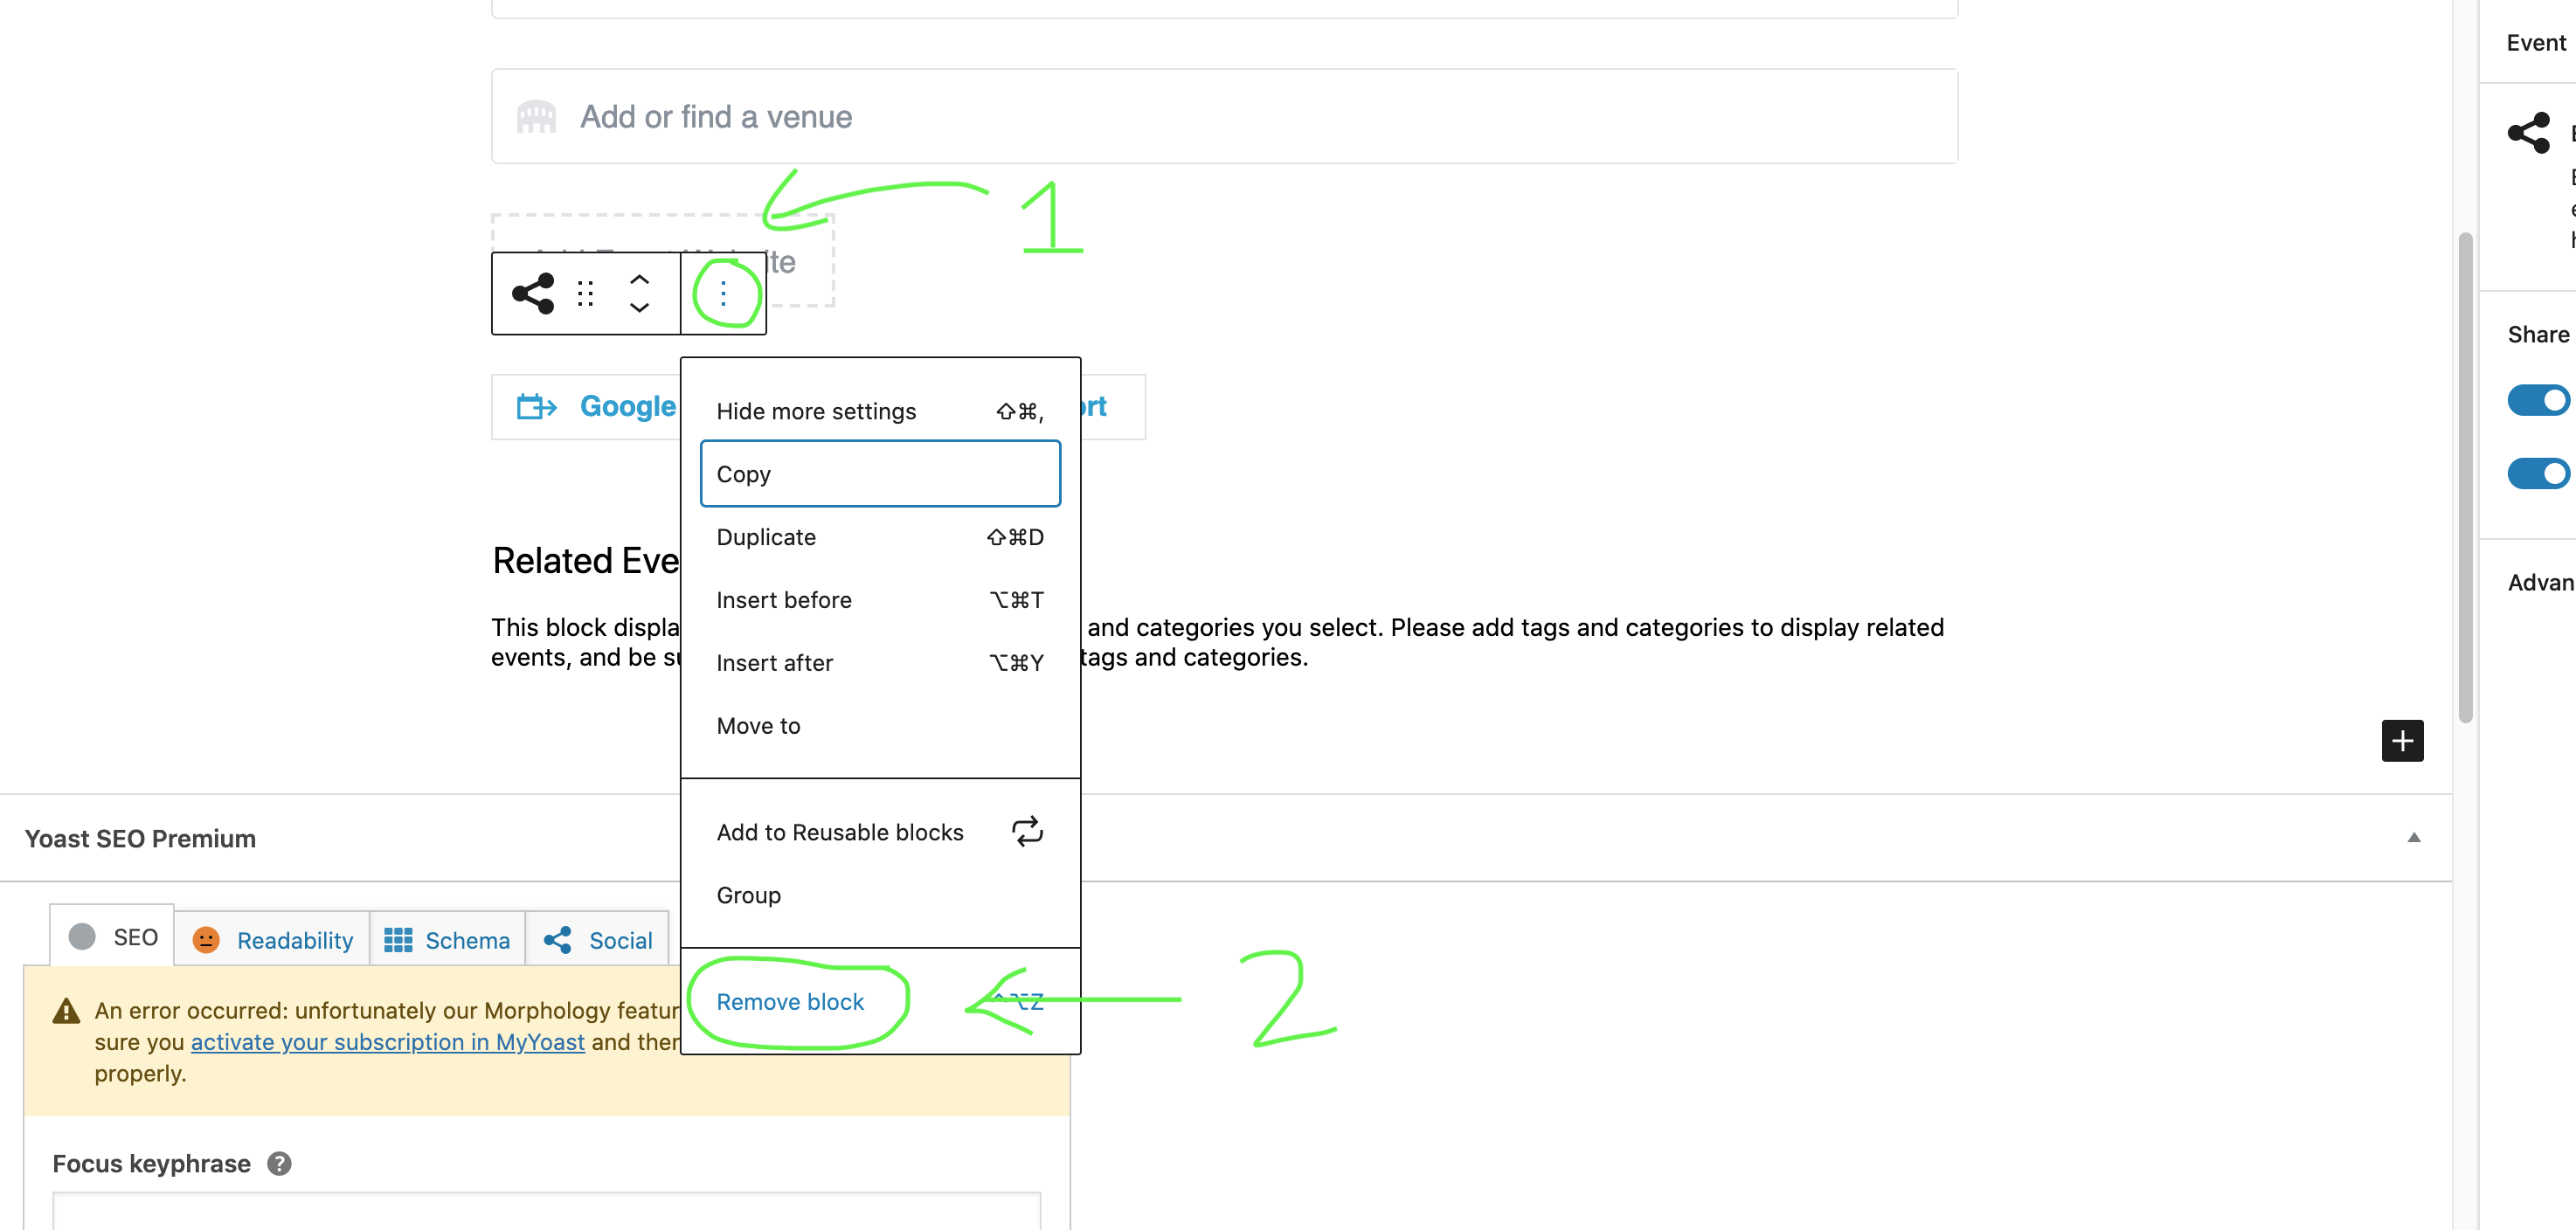
Event Sharing (Calendar Export) Buttons (optional)
These are automatically added to all events. These cannot be edited, but can be removed if you prefer.
To remove the calendar export buttons:
- Click on or near the calendar buttons to get a blue outline around all buttons in the row.
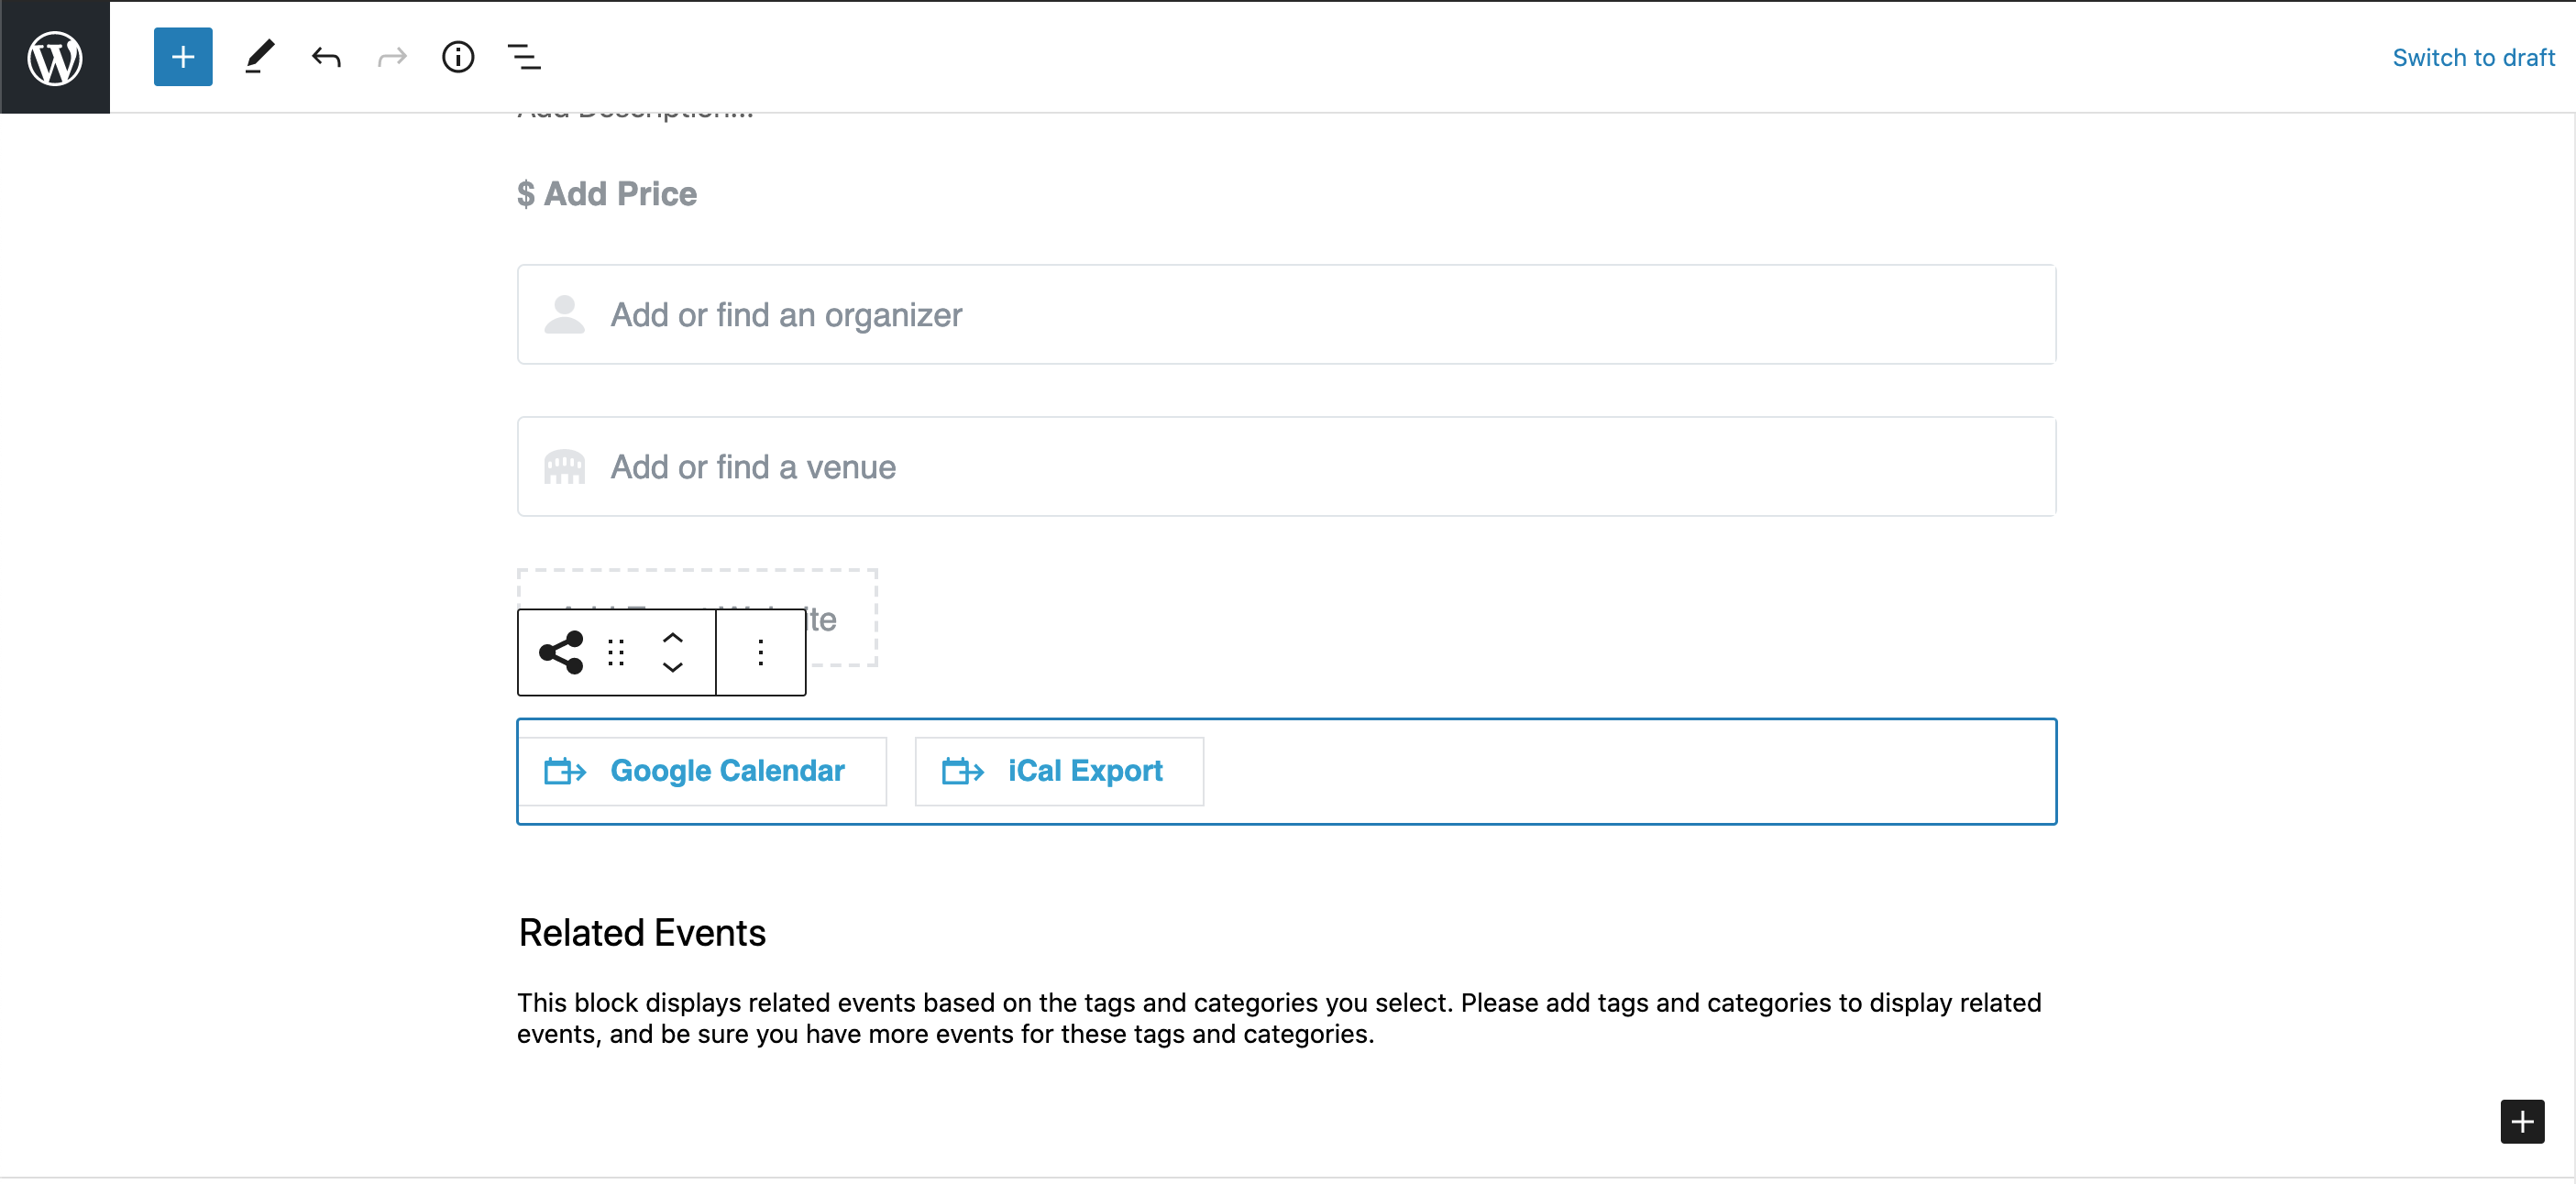
- Click the three vertical dots in the toolbar and select Remove block
Related Events (recommended)
Make sure this block stays at the very bottom of the event editor.
On the event page, the calendar plugin will pull in up to 3 upcoming events that have the same category/categories.
This block can be removed if desired, but keeping it is a great way for users to find other events they may be interested in.
Yoast SEO Premium
You can ignore this section.
Right Side Menu Options
Tags (do not use)
Do not use any tags. Use only categories with events.
Categories (required)
Categories are what pull specific events onto different pages across our website.
- If an event doesn't have a category, it will only appear in the main event calendar listing. This is not the primary place our users are looking at events, so it is important that all events are categorized.
- You can choose multiple categories for a single event.
- Some categories are nested within a specific program. For instance, BBA program has a leadership events category. If your program has leadership events and you would like a category for those, you will need to create a new category nested beneath your program/dept. category. Please reach out to the web team if you need help adding categories for your events.
- Note: Creating a new category will not automatically start to pull related events onto a specific web page. Please reach out to the web team if you have questions about which pages show which types of events or if you would like to create a new event category for a specific web page.
Find category editing in the right hand menu.
- First click on the Event tab under the Preview button
- Scroll down the right menu until you see Event Categories. Click the caret to open the section if it is collapsed.
- Check the list for your category before adding it so you don't duplicate an entry.
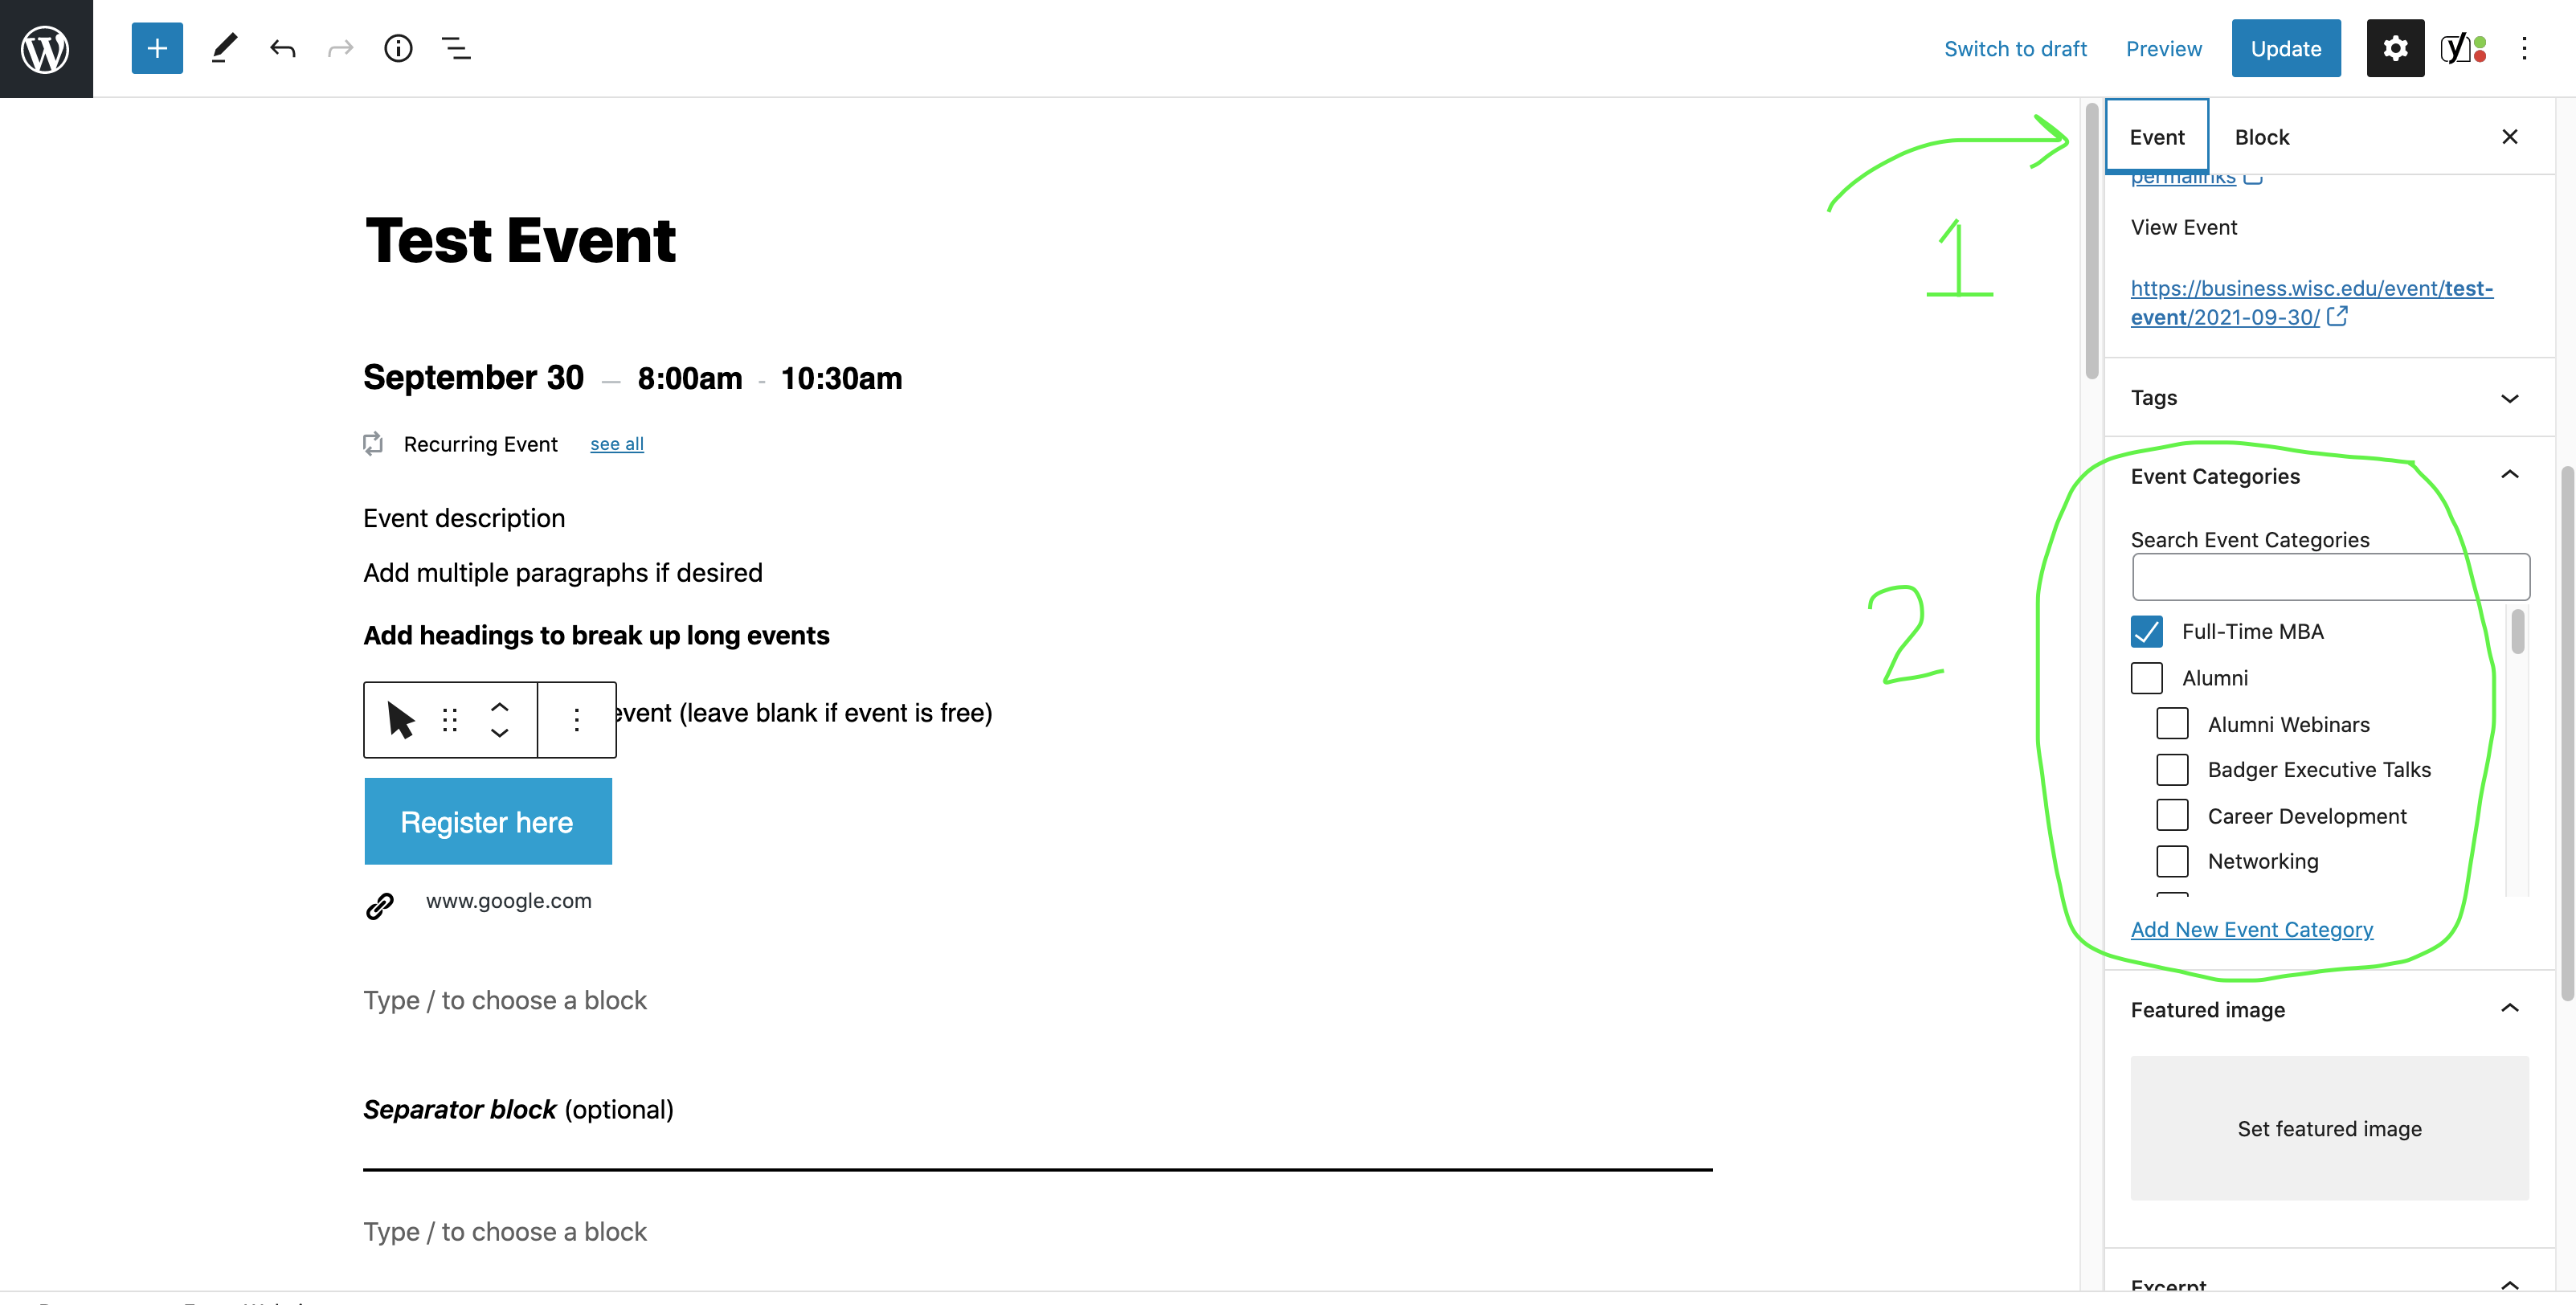
Some existing category options:
- FTMBA
- ExMBA
- PMBA
- Undergraduate
- Admissions
- Pre-business
- Transfer
- Leadership
- Study Abroad
- Recruit & Hire
- Admissions
- Master's Programs
- MSBA
- MA
- MSRE
- MSSCM
- Global Programs
- Alumni
- Networking
- Career Development
- Alumni Webinars
- Badger Executive Talks
- The Business of
- Nicholas Center
- Hawk Center
- Graaskamp Center
- Weinert Center
| Anchor | ||||
|---|---|---|---|---|
|
Add a high-quality image to display with your event details in event listings (such as the main events calendar and program/dept/center event pages) and at the top of your event page (this is optional).
Featured image dimensions: 1200px wide x 450px tall (this image size is only for featured images for events)
- Add your image by clicking the box that says Set featured image and following the directions above for selecting or uploading images to the media library.
- Check your image in a preview window to make sure it looks good.
- Images must have alt text – this is a requirement for accessibility.
- Alt text should include a brief description of what is in the image
- If the image has text in it, alt text must include all of that text for accessibility (someone using a screenreader needs to be able to access the text in the image – alt text is the only way to do that).
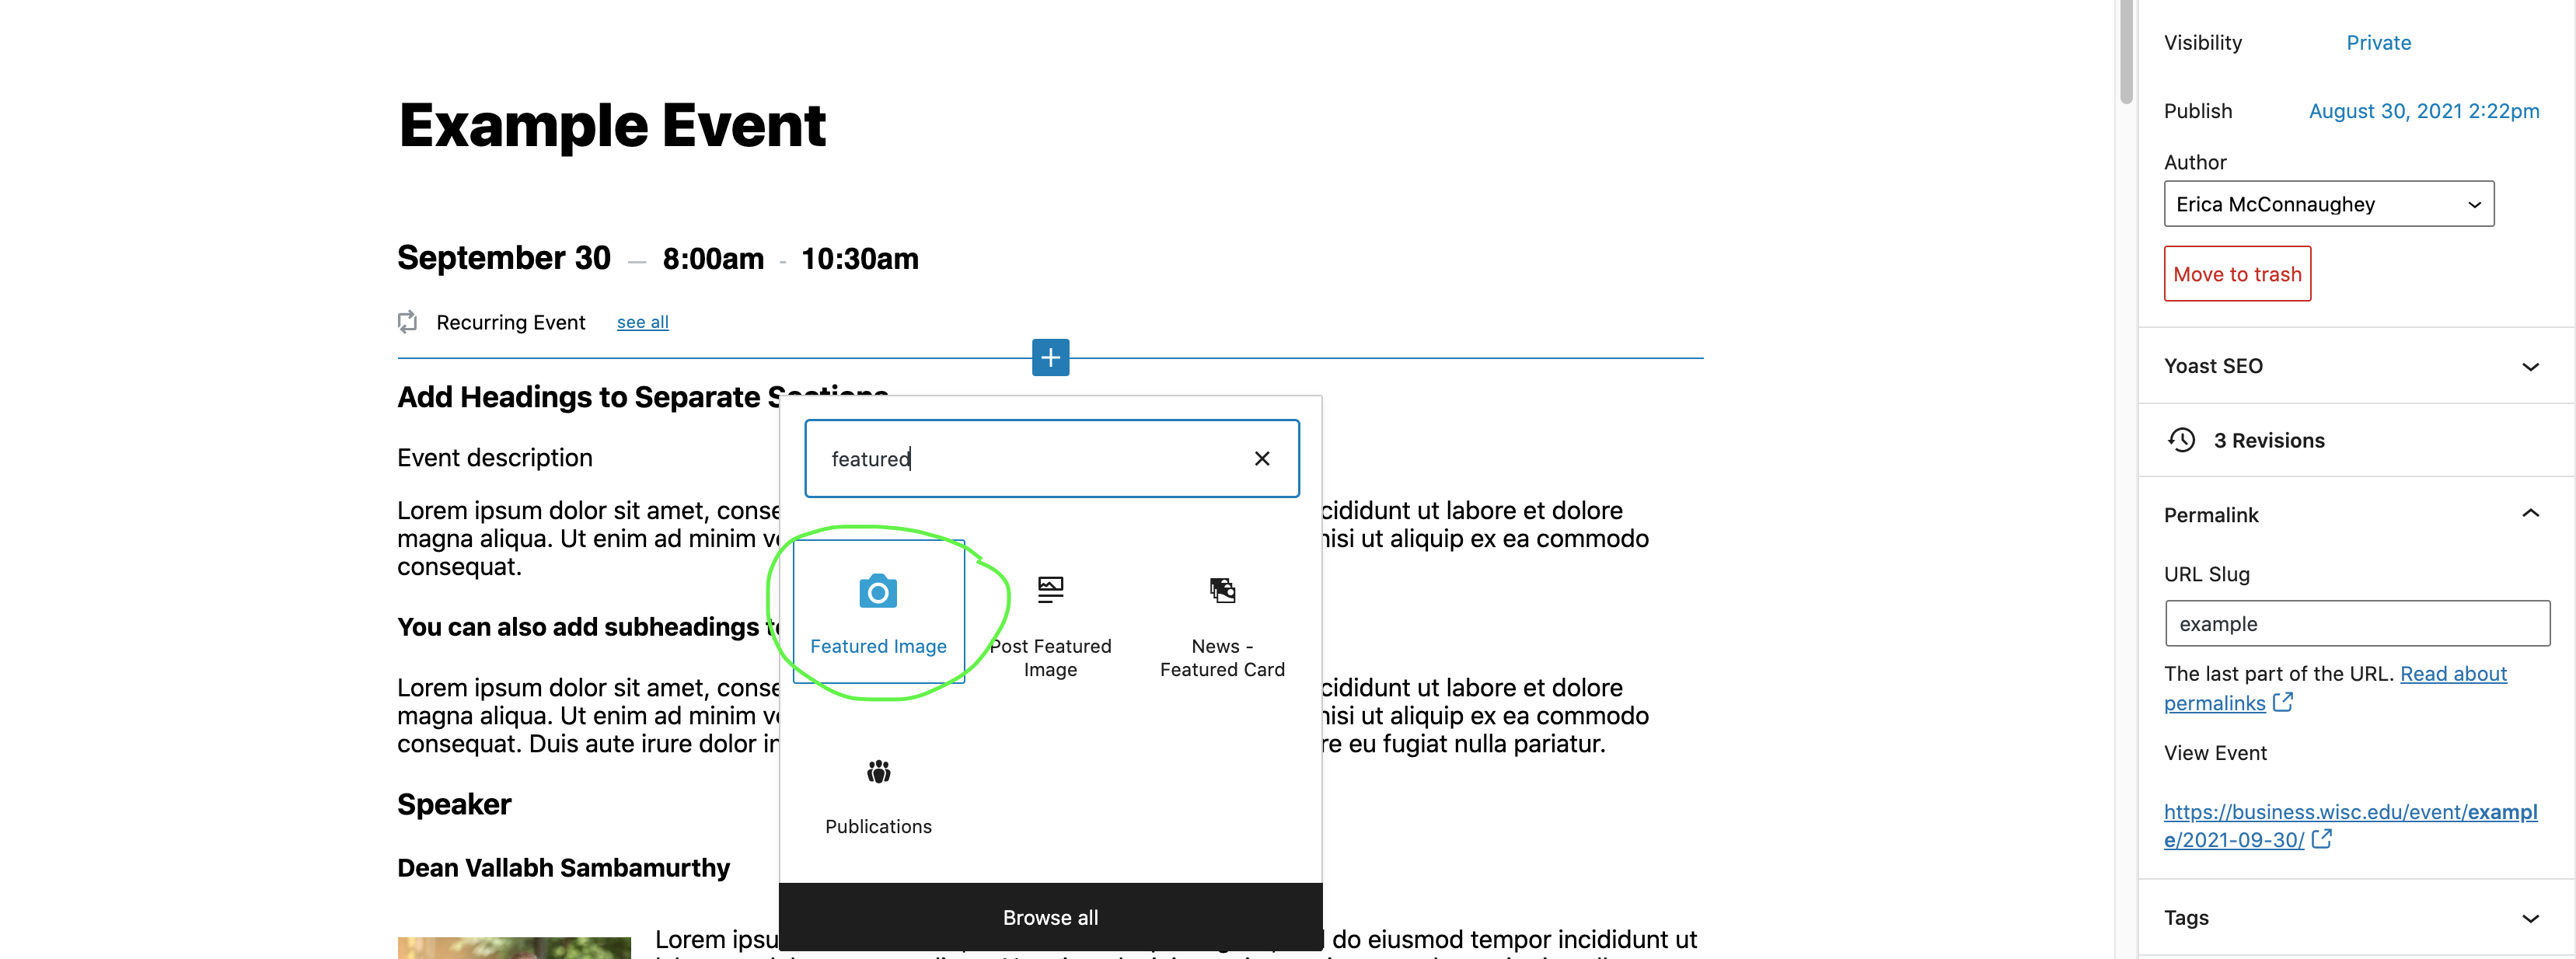
- To display the featured image at the top of an event detail page
- In the event editor, hover your cursor just below the event date and time until you see a plus button and horizontal line appear. Click the plus button to add a block.
- In the pop-up window, type "featured image" and select that block from the list.
- Be sure to save your draft, publish your event, or update your published event so the featured image is viewable on the event page. These options are in the upper right hand corner.

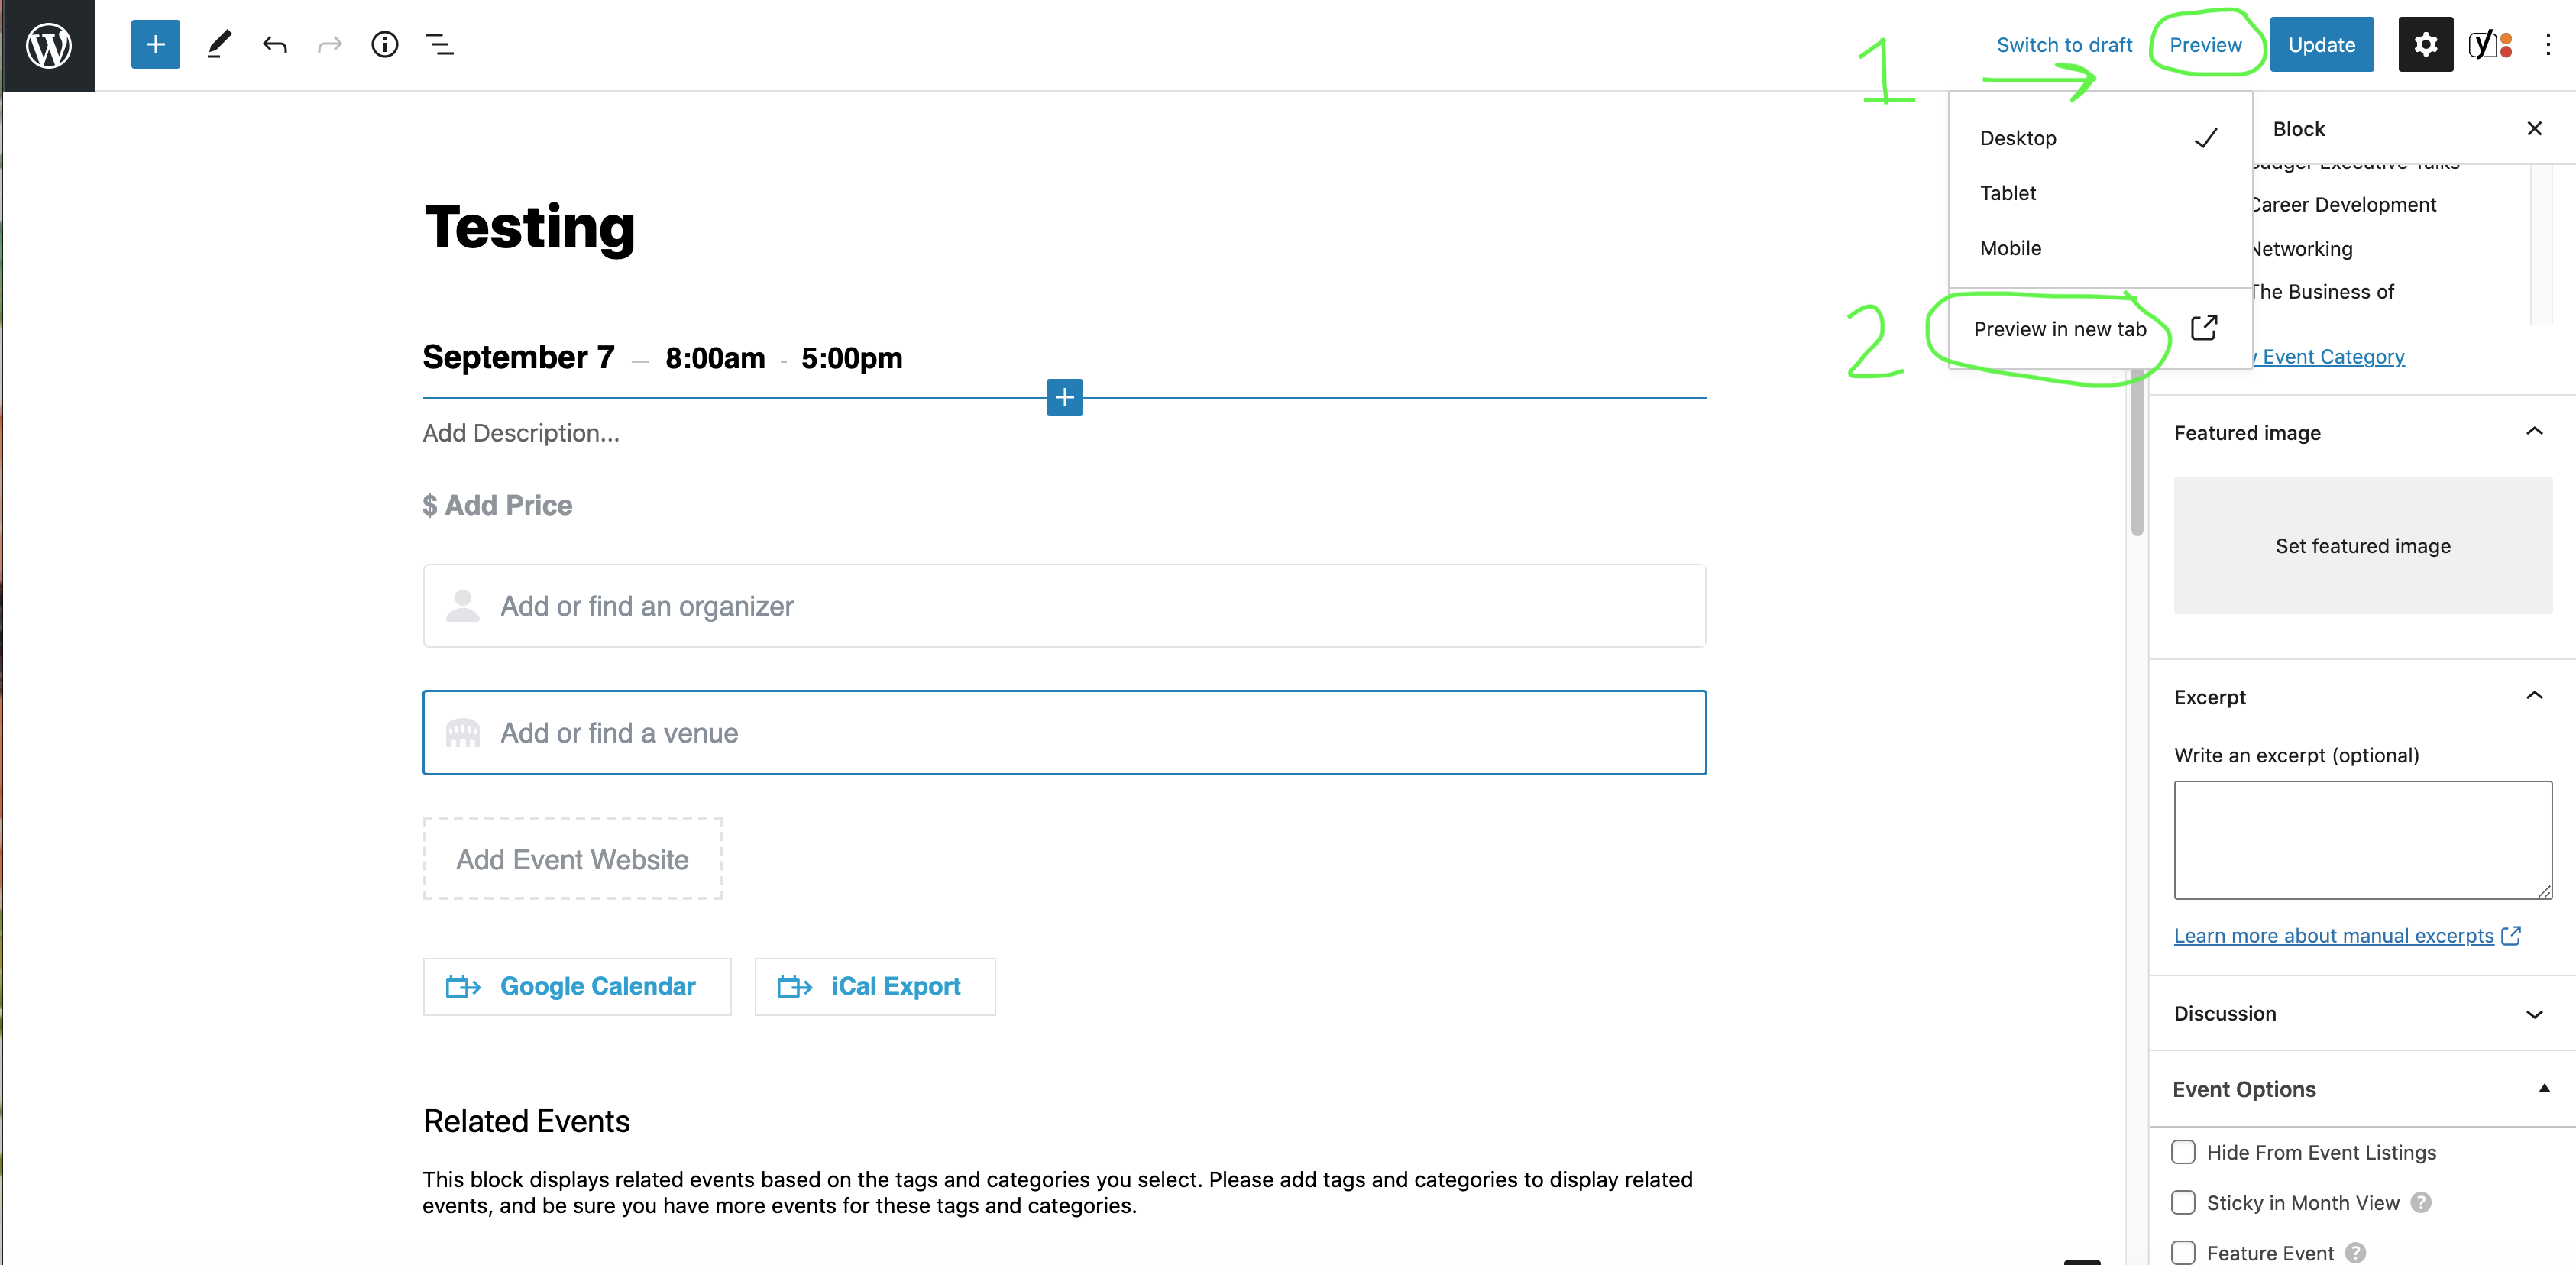
Preview an Event
In upper right corner of the event editor, click Preview, then Preview in a new tab.
Save as a Draft vs. Publish
Save as a draft
- Choose this option when you need to save your event, but you aren't ready to publish it yet.
- You can share the draft with others on your team who have event editing access. They can finish editing if needed.
Publish
- You must publish your event for it to be visible to everyone on the website.
- All subsequent changes to your event must also be published, by clicking the Update button. (This will appear where the Publish button was originally.)
Edit/Delete Existing Events
- Similar to creating an event, navigate to Events and choose yours from the list or use the search to find it.
- Hover over the name of the event to see options for editing or deleting your event.
Unpublish an Event
| Info | ||
|---|---|---|
| ||
We now recommend unpublishing your events once they have passed. Unpublishing means that you can still access the content for the event when logged into WP, but the event will no longer be displayed on our website or in the calendar listing. Why is this important? Published events that have passed can still be found via Google search. This can cause confusion and frustration for our audience, especially when an old event page is easier to find than the new, upcoming event page. |
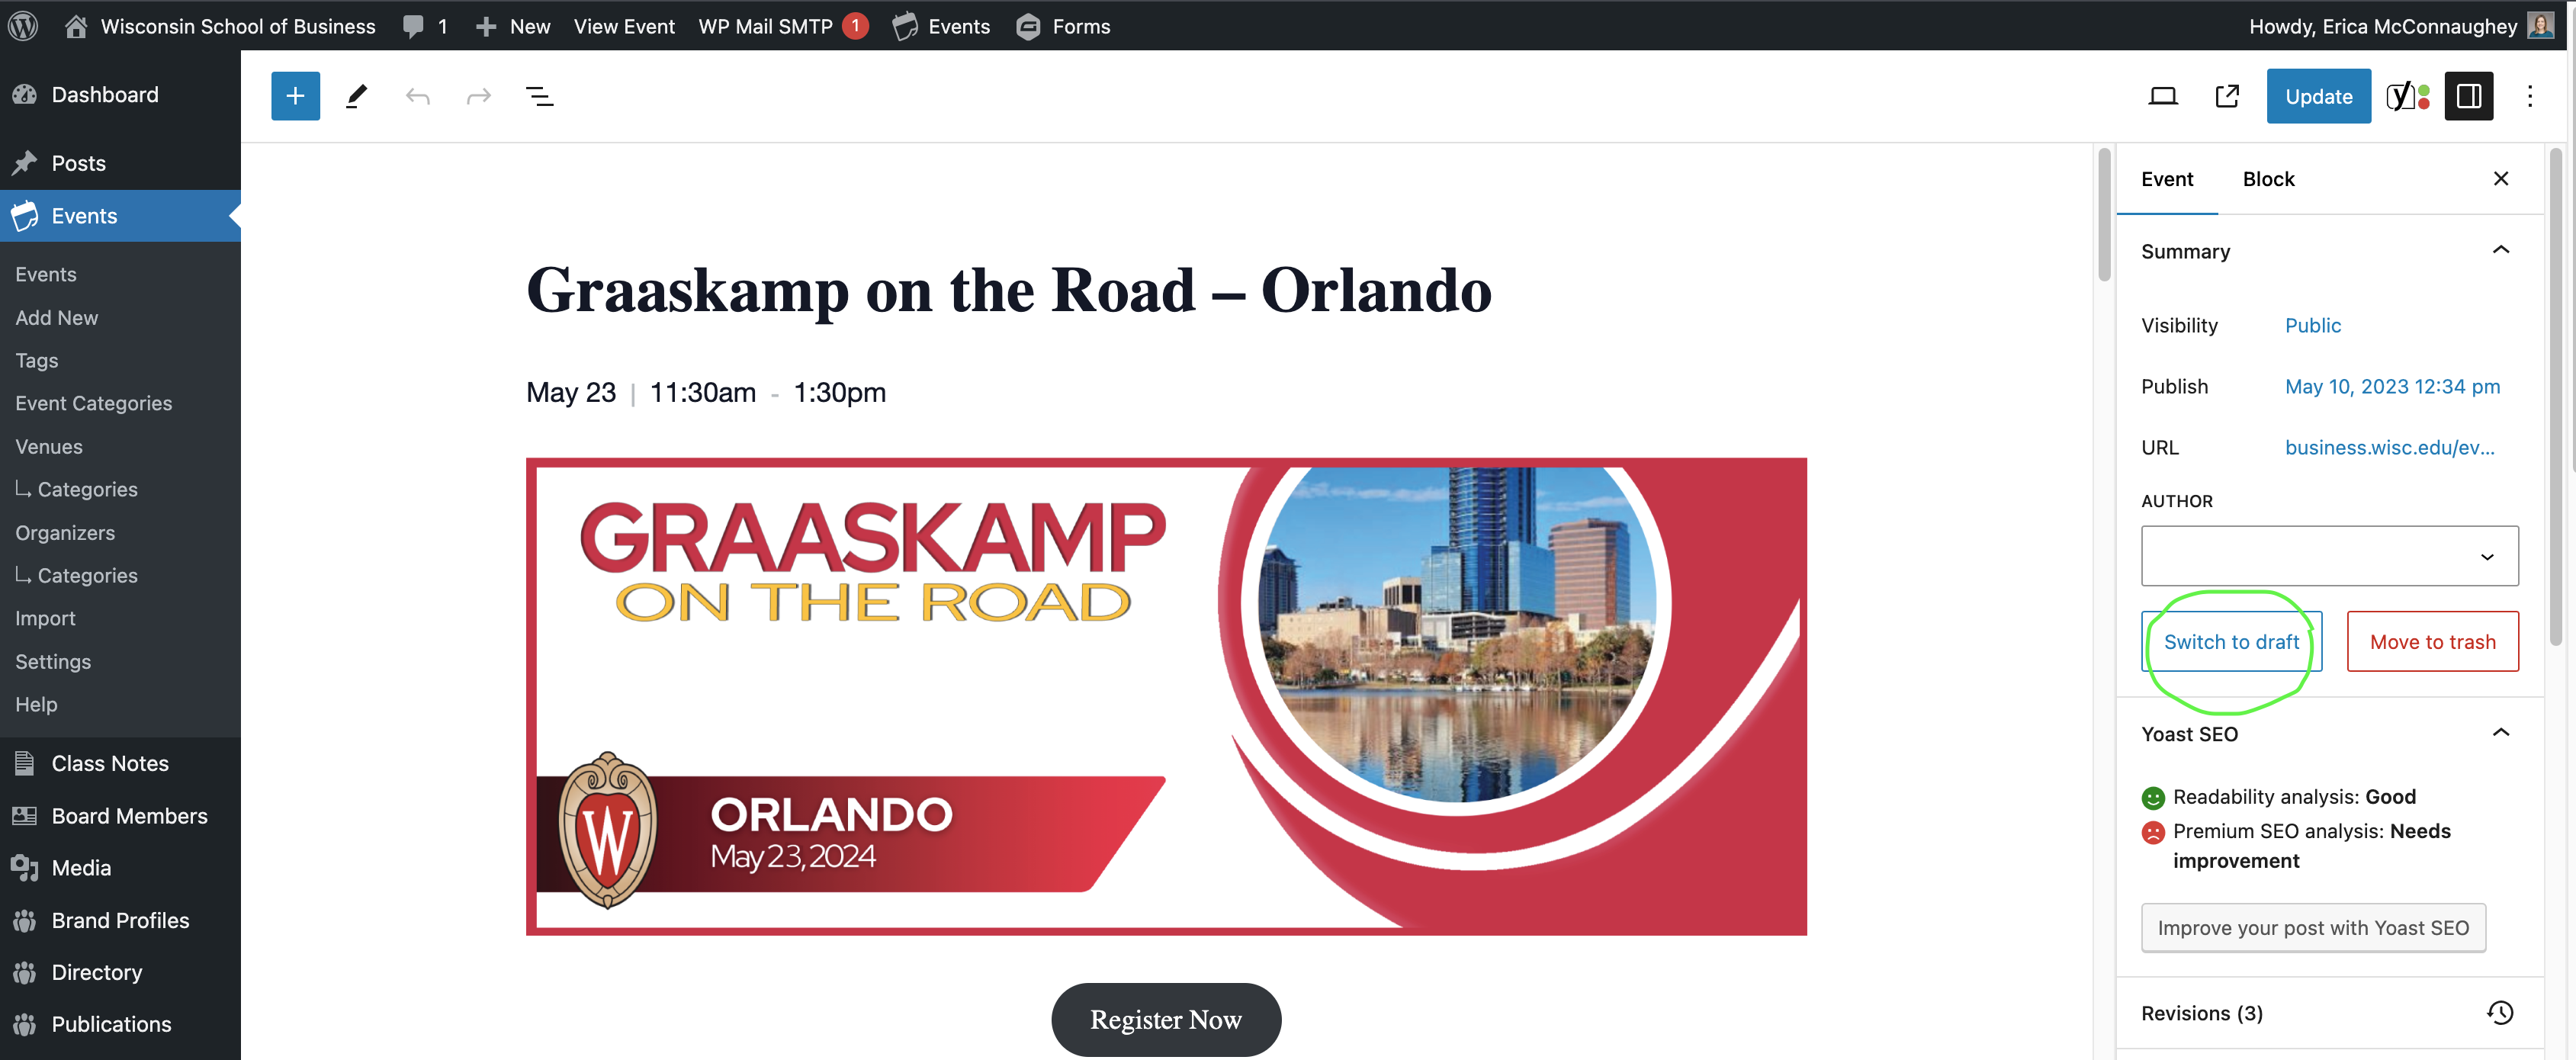
To remove an event from the calendar on our website, but keep a draft of the event page for future reference, you can unpublish the event.
- Open the editing page for your published event.
- In the right sidebar, make sure the "Event" tab is selected.
- Within the Summary section (beneath author), find the Switch to Draft button and select it.
- A pop-up will ask "Are you sure you want to unpublish?" and choose Ok
| Anchor | ||||
|---|---|---|---|---|
|
Recorded in September 2021
| HTML |
|---|
<iframe id="kaltura_player" src="https://cdnapisec.kaltura.com/p/1660902/sp/166090200/embedIframeJs/uiconf_id/25717641/partner_id/1660902?iframeembed=true&playerId=kaltura_player&entry_id=1_1qui2l3p&flashvars[streamerType]=auto&flashvars[localizationCode]=en_US&flashvars[leadWithHTML5]=true&flashvars[sideBarContainer.plugin]=true&flashvars[sideBarContainer.position]=left&flashvars[sideBarContainer.clickToClose]=true&flashvars[chapters.plugin]=true&flashvars[chapters.layout]=vertical&flashvars[chapters.thumbnailRotator]=false&flashvars[streamSelector.plugin]=true&flashvars[EmbedPlayer.SpinnerTarget]=videoHolder&flashvars[dualScreen.plugin]=true&flashvars[Kaltura.addCrossoriginToIframe]=true&&wid=1_3847xfqz" width="649" height="401" allowfullscreen webkitallowfullscreen mozAllowFullScreen allow="autoplay *; fullscreen *; encrypted-media *" frameborder="0" title="Kaltura Player"></iframe> |